 +1 315 210 4488
 +91 798 618 8377
Finding a commercial enterprise that doesn’t want to be available online is nearly impossible. The Logic is simple – people worldwide spend more time on their smartphones using apps than anything else. And it’s now uncomplicated to see why.
Businesses can attain clients fast with cellular apps. People these days expect to have the whole things effortlessly on their phones. But with so many alternatives for mobile application development, it could take time to realize what technology to use to create speedy apps and stay ahead of competitors. To assist with this, Google introduced Flutter, a cross-platform app development kit and UI framework, in 2018.
Flutter is an effective tool that permits developers to create native apps for multiple systems using simply one codebase. Many popular brands, which include Google ads, eBay motors, SpaceX app, Google Pay, and Philips Hue, have used Flutter to develop their apps and exhibit their capacity.
Let’s start using Flutter to create your mobile app! This guide will stroll you through each step and provide the understanding to be successful.
Building A Mobile App With Flutter – Step-by-Step Guide
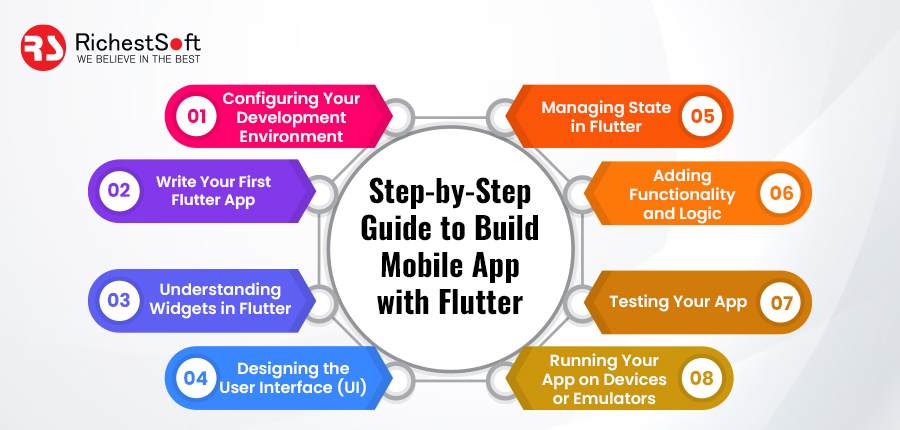
Step 1: Configuring Your Development Environment
(a) Installing Flutter SDK
Installing your computer’s Flutter Software Development Kit (SDK) is the first step. Follow these straightforward steps:
1. To get entry to the authorized website for Flutter, please visit [https://flutter.dev](https://flutter.dev).
2. Download the right SDK record to your working system (Mac OS, windows, or Linux) to start with Flutter.
3. Unzip the downloaded file & hold it in any directory.
(b) Adding Flutter to System Path
To run Flutter commands in the command line effectively, you may want to feature it in your system’s path environment variable:
✅ For Windows:
1. Open the Start menu & search for “Environment Variables.”
2. Click “Edit the system environment variables.”
3. select “Environment Variables” from the menu.
4. find and pick “path” below “system Variables,” then click on “Edit.”
5. Click “New” and add the path to the Flutter SDK directory.
✅ For macOS and Linux:
1. Open the terminal.
2. Use a code editor to get admission to the ‘.bash_profile’ or ‘.zshrc’ file in your home directory.
3. Add the subsequent line to the file’s ending:
export PATH=”$PATH:[PATH_TO_FLUTTER_DIRECTORY] / flutter / bin
Replace `[PATH_TO_FLUTTER_DIRECTORY]` with the actual path to your Flutter SDK.
After saving the file, run “source.zshrc” for macOS to put the modifications into effect.
(c) Verifying Flutter Installation
Run the following command on a fresh terminal or command prompt window to ensure that Flutter has been correctly installed:
flutter doctor
This command checks your system for any necessary dependencies and provides instructions on installing them if needed.
Step 2: Write Your First Flutter App
It’s time to start creating your first Flutter project now that your Flutter development environment has been set up.
(a) Using the Flutter Command Line
Open your preferred command-line interface. For Windows users, this could be the Command Prompt or PowerShell. For macOS and Linux users, it’s the terminal.
(b) Creating a New Flutter Project
Use the following command to start a new Flutter project:
flutter create my_first_app
Replace `my_first_app` with the desired name of your project. This command set up a new Flutter project with the necessary files and dependencies.
(c) Understanding the Project Structure
Use the ‘cd’ command to get to the recently created directory after creating the project. The prime directories and files are provided below for your reference. The following command should be used to start a new Flutter project:
– `lib`: This directory includes the Dart code for your app.
– `android` and `ios`: The platform-specific code for Android and iOS is stored in these directories, accordingly.
– `test`: You can create and execute tests for your app in this directory.
(d) Running Your Flutter App
Use the command underneath to see your program in movement:
flutter run
This command compiles and deploys your app to an emulator or a connected device.
Step 3: Understanding Widgets in Flutter
(a) What Are Widgets?
In Flutter, everything is a widget! The foundation of your mobile app’s user interface is widgets. They can range in complexity from a single button to a whole screen. Creating dynamic and interactive mobile applications requires a solid understanding of widget functionality.
(b) Stateless vs. Stateful Widgets
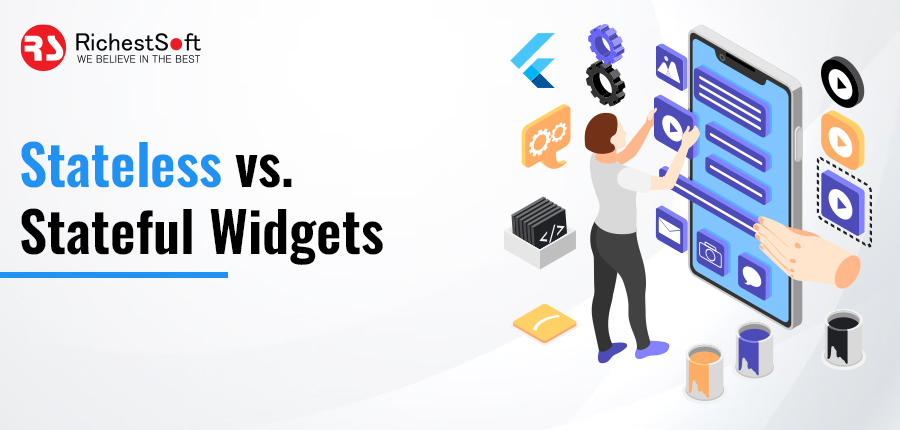
Flutter categorizes widgets into two main types: stateless and stateful.
✅ Stateless Widgets
A stateless widget does not have any internal state that can change. Its appearance and behavior are entirely determined by its configuration and the application’s state. Examples include icons, text labels, and buttons.
✅ Stateful Widgets
On the other hand, a stateful widget can maintain an internal state that can change over time. It allows the widget to react to user interactions, data changes, and other events. Examples include checkboxes, sliders, and forms.
(c)The Widget Tree
Widgets are arranged as tree-like structures, referred to as the widget tree. The widget ‘MaterialApp‘, which establishes your app’s fundamental structure and functionality, is often found at the root of this tree.
From there, you build your user interface by combining various widgets. For example, you might have a “Column” widget with numerous “Text” widgets and a “Button” widget inside of it. This configuration specifies how the components are arranged on the screen.
(d) Building Custom Widgets
While Flutter provides a rich set of pre-built widgets, you’ll often want to create custom widgets to encapsulate specific pieces of functionality. It can help keep your codebase organized and promote reusability.
By extending either “Stateless Widget” or “Stateful Widget” and overriding the “build” method to produce the desired UI, you can construct a customized widget.
Step 4: Designing the User Interface (UI)
Flutter’s widget system makes it easy to create a beautifully designed UI. Widgets like `Container`, `Column`, `Row`, and `Stack` allow you to arrange elements on the screen flexibly and dynamically.
(a) Organizing Widgets with Containers
Containers are like boxes that hold other widgets. They can be used to define the format and look of your UI factors. Right here’s an example of a container that consists of a textual content label:
Container(
padding: EdgeInsets.all(16.0),
color: Colors.blue,
child: Text(
‘Hello, Flutter!’,
style: TextStyle(fontSize: 24.0, color: Colors.white),
),
)
In this example, the container has padding, a background color of blue, and contains a text widget.
(b) Using Rows and Columns
Rows and columns are essential for arranging widgets horizontally and vertically, respectively. They allow you to create grids and structures for your UI. Here’s an example of a column:
Column(
children: <Widget>[
Text(‘First Item’),
Text(‘Second Item’),
Text(‘Third Item’),
],
)
This column contains three text widgets arranged vertically.
(c) Adding Interactive Widgets
Flutter provides interactive widgets like buttons, checkboxes, and text input fields. These widgets allow users to interact with your app. For example, here’s a simple button:
ElevatedButton(
onPressed: () {
// Add your button press logic here
},
child: Text(‘Click Me’),
)
(d) Incorporating Images and Icons
Images and icons are crucial for enhancing the visual appeal of your app. Flutter makes it easy to display images and icons from various sources.
Image.network(‘https://example.com/image.jpg’)
Icon(Icons.star, color: Colors.yellow, size: 48.0)
(e) Adding Navigation
If your app has multiple screens, you’ll need to implement navigation. Flutter provides the `Navigator` widget for managing the navigation stack.
Navigator.push(
context,
MaterialPageRoute(builder: (context) => SecondScreen()),
)
(f) Experimenting and Iterating
Designing a UI is an iterative technique. Mess around with widgets, styles, and layouts until you acquire your app’s preferred appearance and feel.
Step 5: Managing State in Flutter
To update the state of a widget, you typically use the `setState()` method. It triggers a rebuild of the widget tree and updates the UI based on the new state. Here’s an example of updating a counter:
class CounterApp extends StatefulWidget {
@override
_CounterAppState createState() => _CounterAppState();
}
class _CounterAppState extends State<CounterApp> {
int _counter = 0;
void _incrementCounter() {
setState(() {
_counter++;
});
}
@override
Widget build(BuildContext context) {
return Scaffold(
appBar: AppBar(
title: Text(‘Counter App’),
),
body: Center(
child: Text(
‘$_counter’,
style: TextStyle(fontSize: 48.0),
),
),
floatingActionButton: FloatingActionButton(
onPressed: _incrementCounter,
child: Icon(Icons.add),
),
);
}
}
In this example, `_counter` is a state that updates when the floating action button is pressed. The `setState()` method triggers a rebuild of the widget tree.
✅ State Management Libraries
For more complex apps, you should manage the state more organizedly. Flutter offers a variety of state management libraries like Provider, Bloc, Redux, and Riverpod, among others. These libraries provide structured patterns for managing state in larger applications.
Step 6: Adding Functionality and Logic
(a)Writing Logic in Dart
Dart is the programming language run in Flutter development. It’s a flexible language that authorizes you to jot down the Logic of your app. Let’s go through a few ordinary tasks you may need to put in force.
(b) Handling User Input
One of the most common functionalities is handling user input. It could be through buttons, text input fields, or gestures. Here’s an example of a button press handler:
ElevatedButton(
onPressed: () {
// Logic to execute when the button is pressed
print(‘Button Pressed!’);
},
child: Text(‘Press Me’),
)
(c) Making Network Requests
Use the ‘http’ package in Dart or other equivalent packages to send HTTP requests if your program wants to retrieve data from a server. Here is an instance of how to get records from an API:
import ‘package:http/http.dart’ as http;
void fetchData() async {
final response = await http.get(Uri.parse(‘https://api.example.com/data’));
if (response.statusCode == 200) {
print(‘Data fetched: ${response.body}’);
} else {
print(‘Failed to fetch data’);
}
}
(d) Implementing Business Logic
Business logic refers to the rules and operations governing your app’s functions. It could involve calculations, data processing, or other tasks specific to your app’s purpose.
int calculateTotal(List<int> numbers) {
int total = 0;
for (int number in numbers) {
total += number;
}
return total;
}
(e) Navigating Between Screens
You’ll need to implement navigation logic if your app has multiple screens. Flutter provides the `Navigator` widget for managing the navigation stack.
Navigator.push(
context,
MaterialPageRoute(builder: (context) => SecondScreen()),
);
(f) Handling Events and State Changes
Remember the importance of managing the state? When the state of your app changes (due to user actions, data updates, etc.), you’ll use `setState()` to trigger a rebuild of the UI.
Step 7: Testing Your App
Testing helps identify and fix bugs, ensures new features don’t break existing functionality, and provides confidence in the app’s stability. Flutter provides robust testing tools and libraries to streamline this process.
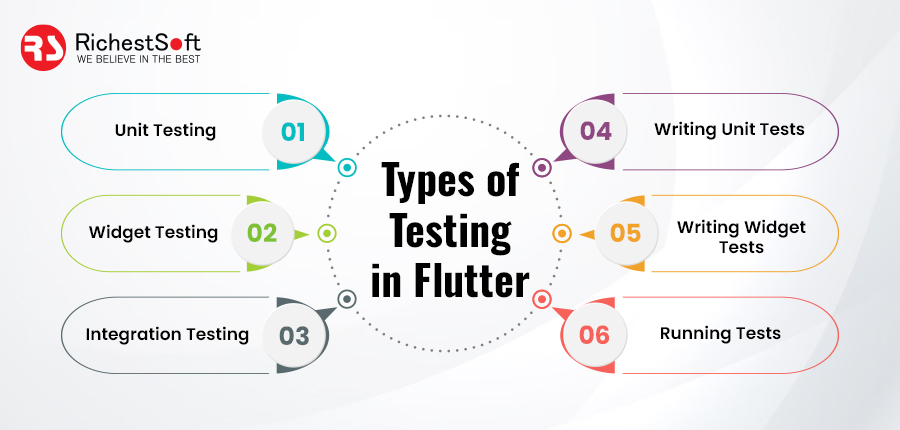
Flutter supports different types of testing:
(a) Unit Testing
Unit tests focus on isolating individual functions, methods, or classes. They verify that specific parts of your code work as expected. Flutter uses the `test` package for unit testing.
(b) Widget Testing
Widget tests allow you to test UI components in isolation. They ensure that widgets render correctly and respond appropriately to user interactions. Flutter’s `flutter_test` package facilitates widget testing.
(c) Integration Testing
Integration tests evaluate how different parts of your app work together. They test entire features or flows, simulating user interactions. Flutter’s `integration_test` package supports integration testing.
(d) Writing Unit Tests
Here is a straightforward Dart unit check example:
int add(int a, int b) {
return a + b;
}
void main() {
test(‘Adding numbers’, () {
expect(add(2, 3), equals(5));
expect(add(0, 0), equals(0));
});
}
In this example, we test the `add` function to ensure it returns the correct sum.
(e) Writing Widget Tests
Widget tests can help you simulate user interactions and verify the ensuing UI.
Here’s an example:
testWidgets(‘Counter increments’, (WidgetTester tester) async {
await tester.pumpWidget(MyApp());
expect(find.text(‘0’), findsOneWidget);
expect(find.text(‘1’), findsNothing);
await tester.tap(find.byIcon(Icons.add));
await tester.pump();
expect(find.text(‘0’), findsNothing);
expect(find.text(‘1’), findsOneWidget);
});
Here, we’re testing a counter app. When we press the add button, the count should increase from “0” to “1,” as expected.
(f) Running Tests
Utilize the following command to run your tests:
flutter test
This command will run all the tests in your project.
Step 8: Running Your App on Devices or Emulators
👉 Testing on Physical Devices
You can use your program in a real-world setting by testing it on actual hardware. To run your software on a real device, observe these steps:
1. Connect Your Device: Join your system to your PC via USB. Ensure your tool has USB debugging and developer mode enabled.
2. Verify Device Connection: Run the subsequent command at a terminal or command prompt:
flutter devices
This command lists all connected devices. Your device ought to be revealed at the listing.
3. Select Device: when your device is indexed, use the following command to launch your app on it:
flutter run -d <device_id>
To connect a connected device, enter its ID from the previous step instead of “device_id“
4. App Deployment: Your app will be compiled by Flutter and released to the linked device. You can now interact with and test your app on the physical device.
👉 Testing on Emulators
You can test your app using an emulator if you cannot access a real device. Flutter gives both Android and iOS emulators. That is how you do it:
1. Launch Emulator: Start your favorite iOS emulator or run the AVD Manager (Android Virtual Device Manager).
2. Verify Emulator Connection: Run’ flutter devices’ in your terminal or command prompt to see if the emulator is listed.
3. Run Your App: To run your mobile app on the emulator, write the subsequent command:
flutter run
Flutter will detect the available emulators and deploy your app to the selected one.
4. Interact and Test: You can now interact with your app on the emulator and test its functionality.
Also Read – Xamarin vs Flutter: Which Framework is Better for Mobile App Development?
FAQs
✔️ Can I make a mobile app with Flutter?
Ans: Definitely! With the help of Google’s decisive Flutter UI toolkit, you could effortlessly layout natively made mobile, web, and computing device applications from an unmarried codebase. It works nicely for creating top-notch Android and iOS mobile apps.
✔️ Is Flutter good for mobile app development?
Ans: Flutter is a great option for developing mobile apps, yes. It offers numerous advantages, including excellent performance, cross-platform compatibility, quick development with hot reload, and various customizable widgets. It makes the top-class solution for organizations and developers seeking to build high-quality mobile apps.
✔️ How do I start building an app with Flutter?
Ans: To start creating an app with Flutter, comply with these steps:
- Installation Flutter: Flutter may be downloaded and set up from a reliable or official website.
- Create an IDE: Deploy the Flutter and Dart plugins in your preferred integrated development environment (IDE), such as Android Studio or Visual Studio Code.
- Establish a New Project: Start a new project using the Flutter create project_name command.
- Start Your App: Enter the command “flutter run” into the console to see your App in action on a connected device or an emulator.
✔️ How to build an Android app using Flutter?
Ans: Follow these easy steps to build the Android app.
- Installing Android Studio and Flutter: Set up an IDE like Android Studio, install Flutter, and customize your development environment.
- Create a New Flutter Project: Use the ‘
Flutter create project_name'command to create a new project. - Run the App on an Android Device: Connect a physical Android device or use an emulator, then run the App using the command `flutter run.’
✔️ Is Flutter easy to learn?
Ans: Yes, Flutter is renowned for being simple to master. It is accessible to developers of varying experience levels because of its reactive-style framework and the Dart programming language. Also, Flutter’s thorough Documentation and vibrant community add to its simplicity of learning.
✔️ Which language is used in Flutter?
Ans: Dart is the programming language used by Flutter. Google developed the modern object-oriented language, Dart. It is intended to build cross-platform, high-performance apps that are geared for client-side development.
How RichestSoft Helps Build Mobile Apps with Flutter?
It is crucial to keep ahead of the competition in the dynamic world of mobile application development nowadays. The good news is that Google has developed Flutter. This cutting-edge UI toolkit facilitates businesses to create high-performing, natively-built applications for numerous platforms using a single codebase. As the leading Flutter app development company, RichestSoft brings a wealth of skills and creativity to boost your online presence.
Reasons?
- Dedicated In-House Team
- Expressive User Interfaces
- Flexible Engagement Models
- Comprehensive Development Services
- On-Time Project Delivery
- Continuous Maintenance Support
- Clear UI Designs
- Agile Methodologies
- Custom Approach
- Detailed Documentation
Conclusion
Starting a project may seem simple, but coding features and functionality can become complicated. To build a web or mobile app, prior experience is necessary. Hiring a Flutter app development company to create your Flutter app is highly recommended if you lack expertise in app development.
If you need skilled Flutter developers to hire, we can assist you. Our Flutter app development services include developing high-performance Flutter apps with the latest technology trends. If you have any questions regarding Flutter app development, we are always available to provide answers. Ultimately, the decision is yours.


